笔者在[1]一文中简单介绍了在darknet中常见的数据结构,本文继续上文的节奏,介绍如何从cfg文本文件中解析出整个网络的结构与参数。
前言
笔者在[1]一文中简单介绍了在darknet中常见的数据结构,本文继续上文的节奏,介绍如何从cfg文本文件中解析出整个网络的结构与参数。如有谬误请联系指出,本文遵守CC 4.0 BY-SA版权协议,转载请联系作者并注明出处,谢谢。
e-mail: FesianXu@gmail.com
QQ: 973926198
github: https://github.com/FesianXu
知乎专栏: 计算机视觉/计算机图形理论与应用
微信公众号:

注意:阅读本文之前,建议阅读[1],以便对darknet的数据结构定义有所了解。 为了简便,本文暂时不考虑GPU下的运行,只考虑CPU运行的情况。
初探
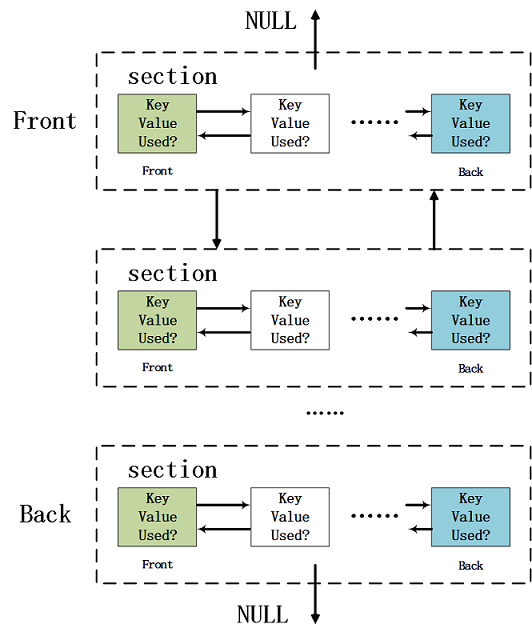
最主要的网络结构和参数解析函数在/src/parser.c里,该函数名为network *parse_network_cfg[2],此函数完成了cfg文件的解析,并且通过解析得到的网络结构与参数初始化network结构体,以便于后续的网络计算。我们从该函数开始进行剖析,部分代码见coda 1.1,传入参数很简单,就是cfg文件的名字char* filename,而返回的就是解析并初始化后的network*。为了让读者回顾darknet的基本数据结构,我们展示Fig 1.1,该链表承载了作为解析过程中的主要数据负载作用。具体的函数分析见code 1.1的注释。
1 | network *parse_network_cfg(char *filename) |
整个parse_network_cfg的全景就如code 1.1所示,其中涉及到了一个临时的中间数据结构size_params,我们之前没有谈到,该结构定义如code 1.2所示。我们如果认真分析整个过程,发现其实这个函数分为两大阶段:解析,网络初始化。因此后续的章节也按照这两个部分分别剖析。1
2
3
4
5
6
7
8
9
10typedef struct size_params{
int batch;
int inputs;
int h;
int w;
int c;
int index;
int time_steps;
network *net;
} size_params;
cfg解析
与cfg解析有关的函数有很多,主要的是
list* read_cfg(char* filename):用于解析主要的section列表等,见Fig 1.1。void parse_net_options(list *options, network *net):该函数用于解析[net]中的每个键值对。layer parse_xxxxx(list *options, size_params params):该类型函数用于解析每个特定的神经网络层的参数,比如convolutional_layer parse_convolutional(list *options, size_params params),本文会以这个函数作为例子进行剖析。
read_cfg
read_cfg输入cfg文件名,输出网络配置解析列表,如Fig 1.1。read_cfg的具体注释见code 2.1。1
2
3
4
5
6
7
8
9
10
11
12
13
14
15
16
17
18
19
20
21
22
23
24
25
26
27
28
29
30
31
32
33
34
35
36
37
38list *read_cfg(char *filename)
{
FILE *file = fopen(filename, "r"); // 读文件
if(file == 0) file_error(filename); // 判空
char *line; // 每一行的指针,记得用完要释放内存
int nu = 0; // 行数计数器
list *options = make_list(); // 新建一个双向链表,这个链表是主链,用于储存section,该结构定义见[1]
section *current = 0; // 每一个section的指针
while((line=fgetl(file)) != 0){ // 读取每一行的数据,如果为0表示读完了
++ nu; // 行计数器加一
strip(line); // 去除头尾的空格
switch(line[0]){
// 如果每一行的第一个字符是'[',那么确定是标志了新的section的开始。
case '[':
// 因此需要对新的section进行内存分配
current = malloc(sizeof(section));
list_insert(options, current); // 将新的section插入options链表
current->options = make_list(); // 新建链表,该链表是用于储存键值对的。
current->type = line; // [xxxx] 表示了该层的类型,将其存入type,比如[convolutional]
break;
case '\0': // 忽略新行
case '#': // 忽略注释
case ';':
// 这些无关的标志位,可以开始释放line内存了
free(line);
break;
default:
// 如果都不是,那么意味着是开始section的真实内容负载了,开始解析,并且将解析出的键值对放置到section中。
if(!read_option(line, current->options)){
fprintf(stderr, "Config file error line %d, could parse: %s\n", nu, line);
free(line);
}
break;
}
}
fclose(file); // 关闭文件
return options;
}
该函数中有一个最为关键的调用函数,就是int read_option(char *s, list *options),该函数用于解析每一个section内的键值对(注意到此时仍然只是字符串),具体定义见code 2.2的详细注释。通过read_cfg()函数,我们将配置解析到了链表中,之后就可以关闭cfg文件,直接读取链表进行网络初始化即可,这样不仅提高了效率,而且减少了因为读取网络过程中,意外修改配置文件导致错误出现的可能性。1
2
3
4
5
6
7
8
9
10
11
12
13
14
15
16
17int read_option(char *s, list *options)
{
size_t i;
size_t len = strlen(s);
char *val = 0; // 键值对中的数值
for(i = 0; i < len; ++i){
if(s[i] == '='){ // 以'='作为截断的标志,中间不能出现空格
s[i] = '\0'; // 截断key-val,将'='替换成截断位,也即是'\0'。
val = s+i+1; // 将val指向值的地址位置,因为已经做过了截断,因此需要+1
break;
}
}
if(i == len-1) return 0;
char *key = s; // 显然之前的一段是键值,因为加了'\0'作为截断,因此现在key和val都是提取出来了
option_insert(options, key, val); // 添加到section链表中,见code 2.3
return 1;
}
1 | void option_insert(list *l, char *key, char *val) |
parse_net_options
这个函数负责解析[net]部分的参数,这类型的参数和一般的section不同,其是全局的网络配置,因此独立成了一个函数。其没有太难理解的东西,基本上就是调用一系列字符串解析函数,这系列的函数会去读取之前解析到的参数链表,将其中section中的键值对解析出特定的数据类型(比如int,float),因此对应有很多类似的函数,比如:
int option_find_int(list *l, char *key, int def)float option_find_float(list *l, char *key, float def)char *option_find_str(list *l, char *key, char *def)
1 | void parse_net_options(list *options, network *net) |
parse_xxx
该类型的函数用于解析某个特定的层,比如convolutional卷积层,deconvolutional转置卷积层,activation激活层等等,其中的xxx表明了层的种类,如果想要定制某个新的层,需要进行类似的注册(也即是需要书写自己的parse_new_layer()函数等)。本文以parse_convolutional()作为例子进行讲解。从code 2.5中可以发现,其中最主要的函数是make_convolutional_layer(),用以通过解析得到的卷积层参数去构造卷积层。1
2
3
4
5
6
7
8
9
10
11
12
13
14
15
16
17
18
19
20
21
22
23
24
25
26
27
28
29
30convolutional_layer parse_convolutional(list *options, size_params params)
{
int n = option_find_int(options, "filters",1);
int size = option_find_int(options, "size",1);
int stride = option_find_int(options, "stride",1);
int pad = option_find_int_quiet(options, "pad",0);
int padding = option_find_int_quiet(options, "padding",0);
int groups = option_find_int_quiet(options, "groups", 1);
// 解析和卷积层相关的参数,比如滤波器通道数,大小,步进,填充等
if(pad) padding = size/2;
char *activation_s = option_find_str(options, "activation", "logistic");
ACTIVATION activation = get_activation(activation_s); // 得到指定的激活层,枚举类型
int batch,h,w,c;
h = params.h;
w = params.w;
c = params.c; // 数据集图片的基本参数,包括长宽,通道数
batch = params.batch; // 批次大小
if(!(h && w && c)) error("Layer before convolutional layer must output image.");
int batch_normalize = option_find_int_quiet(options, "batch_normalize", 0);
int binary = option_find_int_quiet(options, "binary", 0);
int xnor = option_find_int_quiet(options, "xnor", 0);
convolutional_layer layer = make_convolutional_layer(batch,h,w,c,n,groups,size,stride,padding,activation, batch_normalize, binary, xnor, params.net->adam); // 构造卷积层
layer.flipped = option_find_int_quiet(options, "flipped", 0);
layer.dot = option_find_float_quiet(options, "dot", 0);
return layer;
}
每个特定的神经网络层都有其特定的make_xxx_layer()函数,用以将解析得到的参数构造出特定的层。这个内容我们留到下一篇博文进行剖析,至此我们已经完全将cfg文件进行了解析。
该系列其他文章
Reference
[1]. [darknet源码系列-1] darknet源码中的常见数据结构
[2]. https://github.com/pjreddie/darknet/blob/4a03d405982aa1e1e911eac42b0ffce29cc8c8ef/src/parser.c#L742
[3]. https://github.com/pjreddie/darknet/blob/4a03d405982aa1e1e911eac42b0ffce29cc8c8ef/src/list.c#L40