近期在看Shift-GCN的论文[1],该网络是基于Shift卷积算子[2]在图结构数据上的延伸。在阅读源代码[3]的时候发现了其对于Non-Local Spatial Shift Graph Convolution有意思的实现方法,在这里简要记录一下。
前言
近期在看Shift-GCN的论文[1],该网络是基于Shift卷积算子[2]在图结构数据上的延伸。在阅读源代码[3]的时候发现了其对于Non-Local Spatial Shift Graph Convolution有意思的实现方法,在这里简要记录一下。如有谬误请联系指出,转载请联系作者并注明出处,谢谢。
e-mail: FesianXu@gmail.com
github: https://github.com/FesianXu
知乎专栏: 计算机视觉/计算机图形理论与应用
微信公众号:机器学习杂货铺3号店

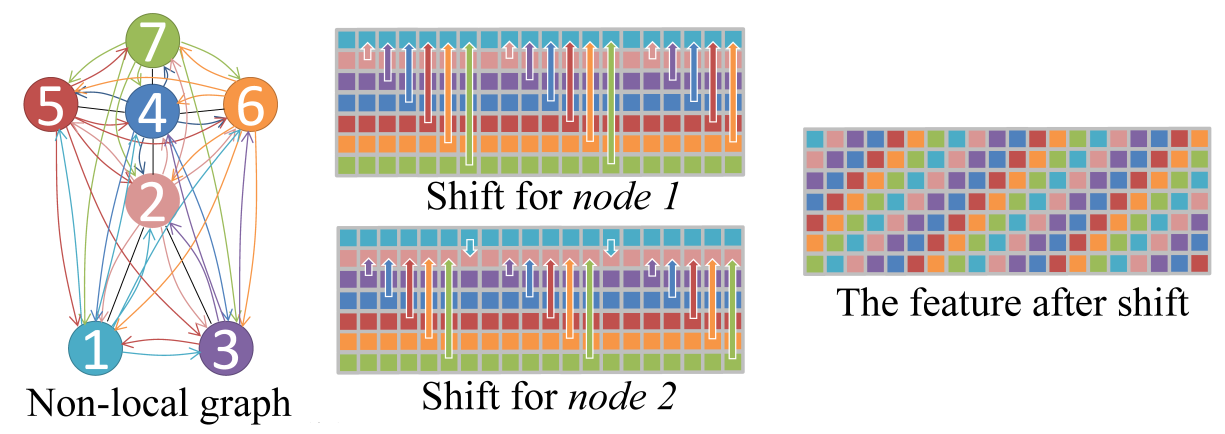
在讨论代码本身之前,简要介绍下Non-Local Spatial Shift Graph Convolution的操作流程,具体介绍可见博文[1]。对于一个时空骨骼点序列而言,如Fig 1所示,将单帧的骨骼点图视为是完全图,因此任何一个节点都和其他所有节点有所连接,其shift卷积策略为:
对于一个特征图
而言,其中 是骨骼点数量, 是特征通道数。对于第 个通道的shift距离为 。

根据这种简单的策略,如Fig 1所示,形成了类似于螺旋上升的特征图样。那么我们要如何用代码描绘这个过程呢?作者公开的源代码给予了我们一种思路,其主要应用了pytorch中的torch.index_select函数。先简单介绍一下这个函数。
torch.index_select()是一个用于索引给定张量中某一个维度中某些特定索引元素的方法,其API手册如:1
2
3
4
5
6torch.index_select(input, dim, index, out=None) → Tensor
Parameters:
input (Tensor) – 输入张量,需要被索引的张量
dim (int) – 在某个维度被索引
index (LongTensor) – 一维张量,用于提供索引信息
out (Tensor, optional) – 输出张量,可以不填
其作用很简单,比如我现在的输入张量为1000 * 10的尺寸大小,其中1000为样本数量,10为特征数目,如果我现在需要指定的某些样本,比如第1-100,300-400等等样本,我可以用一个index进行索引,然后应用torch.index_select()就可以索引了,例子如:1
2
3
4
5
6
7
8
9
10
11
12
13x = torch.randn(3, 4)
x
tensor([[ 0.1427, 0.0231, -0.5414, -1.0009],
[-0.4664, 0.2647, -0.1228, -1.1068],
[-1.1734, -0.6571, 0.7230, -0.6004]])
indices = torch.tensor([0, 2])
torch.index_select(x, 0, indices) # 按行索引
tensor([[ 0.1427, 0.0231, -0.5414, -1.0009],
[-1.1734, -0.6571, 0.7230, -0.6004]])
torch.index_select(x, 1, indices) # 按列索引
tensor([[ 0.1427, -0.5414],
[-0.4664, -0.1228],
[-1.1734, 0.7230]])
注意到有一个问题是,pytorch似乎在使用GPU的情况下,不检查index是否会越界,因此如果你的index越界了,但是报错的地方可能不在使用index_select()的地方,而是在后续的代码中,这个似乎就需要留意下你的index了。同时,index是一个LongTensor,这个也是要留意的。
我们先贴出主要代码,看看作者是怎么实现的:1
2
3
4
5
6
7
8
9
10
11
12
13
14
15
16
17
18
19
20
21
22
23
24
25
26
27
28
29
30
31
32
33
34
35
36
37
38
39
40
41
42
43
44
45
46
47
48
49
50
51
52
53
54
55
56
57class Shift_gcn(nn.Module):
def __init__(self, in_channels, out_channels, A, coff_embedding=4, num_subset=3):
super(Shift_gcn, self).__init__()
self.in_channels = in_channels
self.out_channels = out_channels
if in_channels != out_channels:
self.down = nn.Sequential(
nn.Conv2d(in_channels, out_channels, 1),
nn.BatchNorm2d(out_channels)
)
else:
self.down = lambda x: x
self.Linear_weight = nn.Parameter(torch.zeros(in_channels, out_channels, requires_grad=True), requires_grad=True)
self.Linear_bias = nn.Parameter(torch.zeros(1,1,out_channels,requires_grad=True),requires_grad=True)
self.Feature_Mask = nn.Parameter(torch.ones(1,25,in_channels, requires_grad=True),requires_grad=True)
self.bn = nn.BatchNorm1d(25*out_channels)
self.relu = nn.ReLU()
index_array = np.empty(25*in_channels).astype(np.int)
for i in range(25):
for j in range(in_channels):
index_array[i*in_channels + j] = (i*in_channels + j + j*in_channels) % (in_channels*25)
self.shift_in = nn.Parameter(torch.from_numpy(index_array),requires_grad=False)
index_array = np.empty(25*out_channels).astype(np.int)
for i in range(25):
for j in range(out_channels):
index_array[i*out_channels + j] = (i*out_channels + j - j*out_channels) % (out_channels*25)
self.shift_out = nn.Parameter(torch.from_numpy(index_array),requires_grad=False)
def forward(self, x0):
n, c, t, v = x0.size()
x = x0.permute(0,2,3,1).contiguous()
# n,t,v,c
# shift1
x = x.view(n*t,v*c)
x = torch.index_select(x, 1, self.shift_in)
x = x.view(n*t,v,c)
x = x * (torch.tanh(self.Feature_Mask)+1)
x = torch.einsum('nwc,cd->nwd', (x, self.Linear_weight)).contiguous() # nt,v,c
x = x + self.Linear_bias
# shift2
x = x.view(n*t,-1)
x = torch.index_select(x, 1, self.shift_out)
x = self.bn(x)
x = x.view(n,t,v,self.out_channels).permute(0,3,1,2) # n,c,t,v
x = x + self.down(x0)
x = self.relu(x)
# print(self.Feature_Mask.shape)
return x
我们把forward()里面的分为三大部分,分别是:1> shift_in操作;2> 卷积操作;3> shift_out操作;其中指的shift_in和shift_out只是shift图卷积算子的不同形式而已,其主要是一致的。整个结构图如Fig 2(c)所示。

其中的卷积操作代码由爱因斯坦乘积[4]形式表示,其实本质上就是一种矩阵乘法,其将1
2x = torch.einsum('nwc,cd->nwd', (x, self.Linear_weight)).contiguous() # nt,v,c
x = x + self.Linear_bias
而进行的掩膜操作代码如下所示,这代码不需要太多仔细思考。1
x = x * (torch.tanh(self.Feature_Mask)+1)
那么我们着重考虑以下的代码:1
2
3x = x.view(n*t,v*c)
x = torch.index_select(x, 1, self.shift_in)
x = x.view(n*t,v,c)
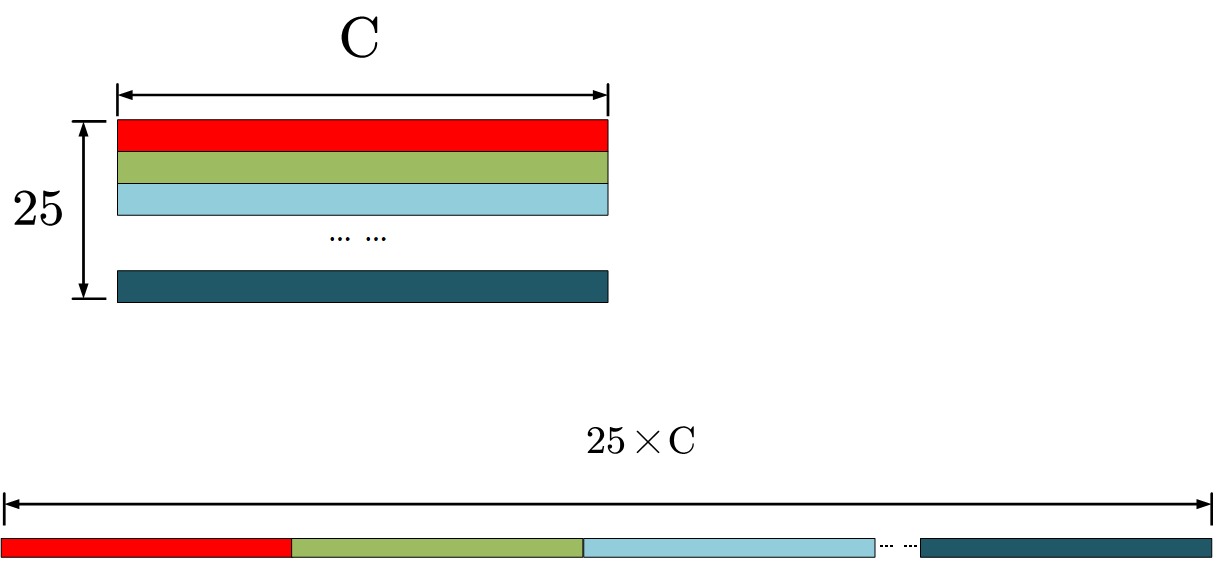
第一行代码将特征图展开,如Fig 3所示,得到了torch.index_select对特征向量的不同分区进行选择得到最终的输出特征向量,选择的过程如Fig 4所示。

那么可以知道,对于某个关节点

在以这个举个代码例子,例子如下所示:1
2
3
4
5
6
7
8
9
10
11
12import numpy as np
import torch
array = np.arange(0,15).reshape(3,5)
array = torch.tensor(array)
index = np.zeros(15)
for i in range(3):
for j in range(5):
index[i*5+j] = (i*5+j*5+j) % (15)
index = torch.tensor(index).long()
out = torch.index_select(array.view(1,-1), 1, index).view(3,5)
print(array)
print(out)
输出为:1
2
3
4
5
6tensor([[ 0, 1, 2, 3, 4],
[ 5, 6, 7, 8, 9],
[10, 11, 12, 13, 14]])
tensor([[ 0, 6, 12, 3, 9],
[ 5, 11, 2, 8, 14],
[10, 1, 7, 13, 4]])
我们把这种正向移入的称之为shift-in,反过来移入则称之为shift-out,其索引公式有一点小变化,为:1
2
3
4
5
6
7
8
9
10
11
12import numpy as np
import torch
array = np.arange(0,15).reshape(3,5)
array = torch.tensor(array)
index = np.zeros(15)
for i in range(3):
for j in range(5):
index[i*5+j] = (i*5-j*5+j) % (15)
index = torch.tensor(index).long()
out = torch.index_select(array.view(1,-1), 1, index).view(3,5)
print(array)
print(out)
输出为:1
2
3
4
5
6tensor([[ 0, 1, 2, 3, 4],
[ 5, 6, 7, 8, 9],
[10, 11, 12, 13, 14]])
tensor([[ 0, 11, 7, 3, 14],
[ 5, 1, 12, 8, 4],
[10, 6, 2, 13, 9]])
输入和shift-in只是因为平移方向反过来了而已。
当然,进行了特征向量的shift还不够,还需要将其reshape回一个特征矩阵,因此会有:1
x = x.view(n*t,v,c)
这样的代码段出现。
Reference
[1]. https://fesian.blog.csdn.net/article/details/109563113
[2]. https://fesian.blog.csdn.net/article/details/109474701
[3]. https://github.com/kchengiva/Shift-GCN
[4]. https://blog.csdn.net/LoseInVain/article/details/81143966